A wooden summerhouse – design and construction.

This summer, my family and I are building a wooden summerhouse from scratch in our garden. I have designed the building myself and it will be an octagonal structure with a ‘green’ roof, external deck and space for seating and a small woodburner inside.
The process began last winter, when we salvaged the timber required for the structure from the many windblown trees resulting from the winter storms. We did this a few months in advance of actually starting construction to give the wood a chance to season a little and reduce in weight before we started having to handle it. We selected a range of Douglas Fir poles of varying diameters to suit different parts of the building. While the wood was drying out we steadily peeled off the bark using drawknives.
When spring arrived, it was time to begin building. The first step was to set out the 8 corners of the octagon and dig a 70cm deep hole at each of these points. A layer of gravel was place at the base of each hole to aid drainage.
 To help preserve the ends of the posts going into the ground, we decided to char them. We did this by suspending the post over a small fire and gradually rotating the pole to achieve an even amount of char all round. The ends were then painted with bitumen for extra protection. When dry, the posts were ‘planted’ in the ground and tamped down firmly.
The next stage was to complete the ‘henge’ by adding crosspieces between the tops of the posts. The crosspieces were half-lapped and fixed to the top of each post for stability. This will form a solid base for our roof.
The construction of the roof and the development of the summerhouse will be described in a follow-up article.
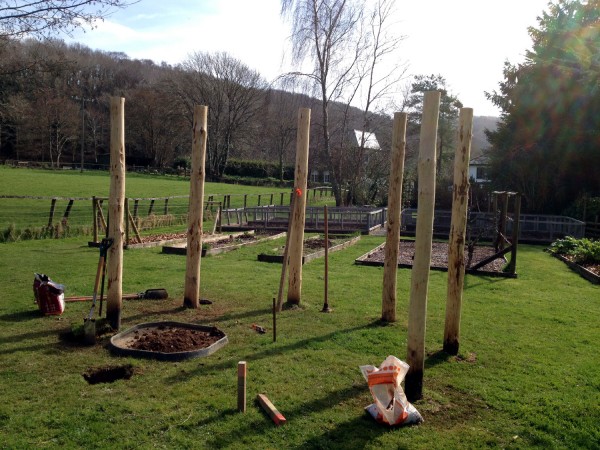
Positioning the post in the ground
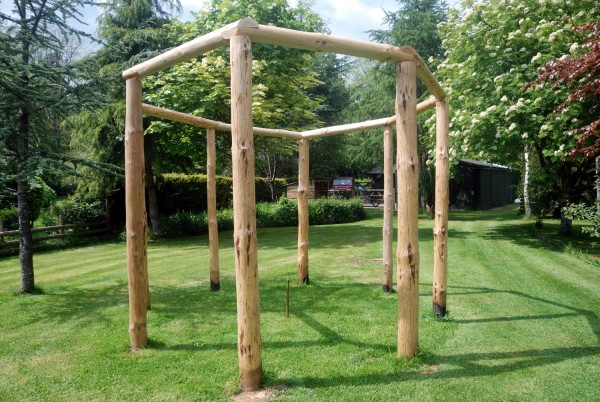
The completed henge
Comments are closed for this post.
Discussion
Looking good. I would like to do something similar myself. How did you fix the crosspieces to the posts?
We all love timber here no matter what ! Using fallen trees even better. looking forwards to the next stage.
Hi Tony,
Thanks for your comment. I’ve never had the opportunity to design a tree house before but it would be an exciting challenge.
A brilliant idea on using fallen trees. Can you design a ‘Tree House’? I also await next instalment.
HI like what you are doing sounds great. Get in touch with George on small spaces on tv. Take lots of pictures as you build. Good luck will be watching the project. John.
Looking good. Can’t wait for the next installment!
Hi Liz,
In theory, charring the wood produces a biologically dead layer which is inedible to bacteria. It should also help to repel moisture and prevent water soaking into the wood. However, when I was researching natural methods of preserving posts, opinions on the effectiveness of charring the wood did seem to vary a lot. I thought that it was worth trying out – and it was fun to do!
I wondered why charring the ends of the poles delays their rotting. Is charred wood (charcoal like) inedible to fungi?
This is a wonderful idea and design; I cannot wait until it is finished, so I can sit and drink cups of tea and admire the garden. I am very proud of my big sister Anita, for all of her time and effort on this project and thanks also to my dad and mum who have been helping her :)
Good luck with the rest of the build!

Hi Ian,
The crosspieces were fixed with a couple of long screws put vertically down through the lapped joint and into the top of the post. I used the drawknife to scrape away a small flat section on the underside of the crosspiece so it would sit firmly on the post. If you are thinking of building a timber henge structure, have a look at Tony Wrench’s roundhouse (http://www.thatroundhouse.info/) – this is where I got much of my inspiration from and his website has some useful information on construction techniques.
Anita
14 July, 2014